
Welcome back to the tracing art lesson.

This was were we left off.
After applying the charcoal drawing...

the picture looked like this.

I started by painted the letters.
I did this because they were at the bottom,
and I didn't want to accidentally rub them off while
painting the picture.
After the lettering was dry,

I painted some detail on the robin and tree branches.
I made sure I took extra care to carefully trace his eye
when I had the original drawing taped on.
I have found that if the shape is correct
and
the eye is correct,
the rest of the bird creature will look
reasonably well
no matter if you add a lot of detail or not.
Get these two right,
and you are on the right track.
After the image was dry,

I painted the beak a light watered down yellow
and later touched it with a dab of orange.
I later did the same with the legs.
I then mixed a tiny bit of white with a small amount of black
and later touched it with a dab of orange.
I later did the same with the legs.
I then mixed a tiny bit of white with a small amount of black
and added a drop of water.
The consistency is wet,
but not puddling.

I then brushed this onto the back of the robin
with sweeping strokes using a flat square-tipped brush.

I added a touch of a slightly darker shade
on the top of the wings
where it looked darker on the original picture.
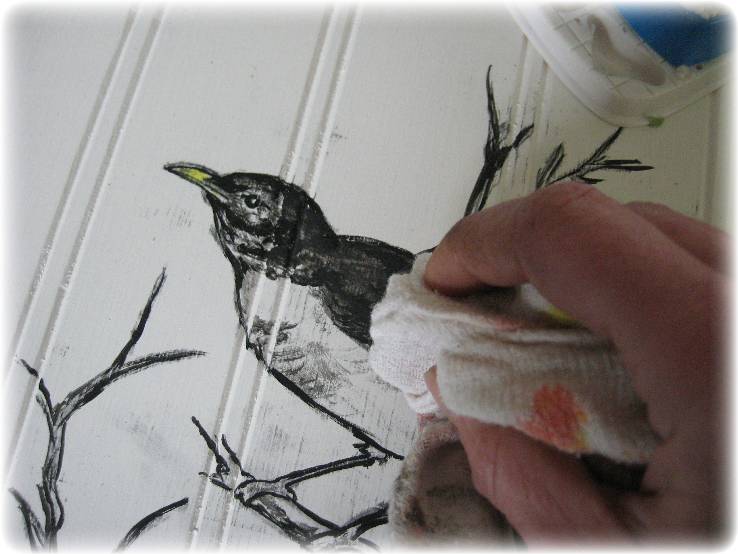
I then carefully took a dry rag,
and just barely touched it to the painted bird
in light sweeping strokes
so that it would have slight color
but the detail of the wings would come through.

(You can see here that when I painted the detail on the wings,
I used curved arch strokes for the top of the wings
as well as some light dry-brushed pouncing for shading.
as well as some light dry-brushed pouncing for shading.
I used straighter, longer strokes for the tips of the wings and tail.)

I applied straight black paint to the head

and then carefully dabbed some of this off as well.

I added three spots of white around the eye:
a slight curve over the eye that widens just a hair toward the back of the eye,
a slight arch on the bottom of the eye that follows the curve of the eye
from the lower front of the eye back slightly past the middle,
and a tiny triangle with the base toward the front of the eye.

I then took a round brush and loaded it with slightly wet red paint.

This was pounced on the belly of the robin
and stopped right before the leg.

I dabbed some gray muddied white paint
to the back leg area,
making the gray slightly darker where they are shaded by the
wing and of the robin.
I then painted the branches with a
considerably wet brown paint
dabbing it up with a rag wherever it wanted to run or spread too much.

When everything was very dry,
I took a dry clean paper towel and dampened it.
I rubbed this all over the painting to remove the charcoal sketch marks.

I then added some brush stokes of a light green for leaves
in congregated places randomly along the branches.

A touch of dark green was applied to the base of the leaves and spread upward
to give them shading,
leaving just a couple unshaded to give more realism.

When the painting was completely dried
(a day later to be sure the paint can't be wipe off)
I gathered some Dark Walnut stain
and some
Howard Feed n Wax.
I read about using this combination on a blog
(which I will list here, when I can figure out which one it was;
if it was yours, please tell me).
I thought I'd see if I liked how it worked.
She said to use 3 parts wax to one part stain.
Howard Feed n Wax.
I read about using this combination on a blog
(which I will list here, when I can figure out which one it was;
if it was yours, please tell me).
I thought I'd see if I liked how it worked.
She said to use 3 parts wax to one part stain.


I added just a touch of the stain to the wax,
finding that I still needed to ad another 1 Tbs. of wax
to balance the stain;

I painted this carefully all over the board...

being sure to get it into the cracks.
This then sat for 20 minutes.
I've read now that it should be allowed to dry
until it doesn't feel tacky.
Then the whole thing is rubbed with a clean, lint free cloth to buff it.


The artwork was then complete.
Next time I will show you the simpler version of just doing a silhouette.
I did this on the back of the board:
I like handy Christmas decorations.
I just have to flip the board around and I'm done!

It involves just filling in the whole shape with black
avoiding the detail altogether
while still looking quite nice.

Of course,
I do have some tips for doing this as well.
There was a terrible problem with this when I was done;
a tip that I can give you to spare you such an error.
There was a terrible problem with this when I was done;
a tip that I can give you to spare you such an error.
It is probably quite obvious.
My husband and daughter were quick to acknowledge my fears
when I asked if they noticed,
when I asked if they noticed,
so I will also show how it was fixed.
Until next time,
I hope you are able to enjoy a cheerful robin's spring song.
Linking to:


I have to chuckle here. The fact that you think this would be relatively easy for anyone to do embodies the reason you are an artist, and I am not. I even mess up tracing!
ReplyDeleteHaving said that, I LOVE your finished product. It is just completely cheery and charming.
=)
That is lovely! You have a real talent. I am able to trace some things but have never tried anything of that detail. Great job!
ReplyDeleteThis is gorgeous! What an artist you are pretty lady, wish I can do this, your finish product is awesome! Love it! Thank you for coming by and following too.
ReplyDeleteGod bless your Easter Sunday sweetie. Hugs.
FABBY
Beautiful! I found you on the Graphics Fairy. This is really a lovely project.
ReplyDeleteXO Diane
Thank you for the painting tips! Your work is beautiful!
ReplyDelete