
Happy day to you!
The kitchen is not done,
but I thought I'd take you along as the various segments are completed
rather than wait until the end result.
(I don't know that you'll still be around in three years.
Yes, I'm teasing...
I hope).
The kitchen is not done,
but I thought I'd take you along as the various segments are completed
rather than wait until the end result.
(I don't know that you'll still be around in three years.
Yes, I'm teasing...
I hope).

Before I get to the fun
I thought I'd show you this:

it is our kitchen floor.
It is...
rough.
It's an old pine floor,
probably not the original to the house,
which was built in 1850,
because pine doesn't last as long,
or so we've been told.
An estimate to it's age
is the first half of the 1900's.
(Our living room floor is oak
and is from an earlier time.
It does not sway and creak the way our kitchen floor does.)
The kitchen floor helped in our choice of counter top.
The cabinets were being custom made by an Amish man.
(if you go that route,
make sure you photo copy all instructions and keep some for yourself:
a lesson I learned,
although it turned out all right in the end.)
He made the unfinished butcher block counter top.
(It ended up being less than what we would pay for the cheapest counters
at Home Depot.
Of course, that was more cheerful in regards to our budget as well.)
I wanted a distressed look.
It would fit the kitchen with its distressed floor
much better than a perfect one would.
What a help research on the Internet is!

I took the ideas I liked the most
and practiced on a scrap board.
Then I hit the real counter top...

literally.
This old sock was full of screws and nails and bolts
and whatever else was in my husband's
plastic container of miscellany.
plastic container of miscellany.
I whacked the counter with this so hard,
it put holes in the sock
and metal weaponry began flying all over the room.
I thought I'd better not use up all my husband's socks,
so
and metal weaponry began flying all over the room.
I thought I'd better not use up all my husband's socks,
so
I then whipped the counter up and down with the chain
trying not to let it bounce off and knock myself out.
I was unsure as to how much to mar the counter
so I kept referring to
so I kept referring to
a beautiful old blanket chest
that my husband's aunt gave to us.

I love the color of it
and the well worn marks all over it.
I used this as a guide to my distressing efforts.
I noticed there were an assortment
of scratches and black wound markings on our old chest...

so I tried to make some on my counter,
using a method suggested on a blog I read.
(Sorry that I don't have the details to the many websites I
viewed in my searches for this.
If you come along and recognize any of your own tips,
please leave me a comment and I'll ad you at the end of this post.
Thank you!)
If you come along and recognize any of your own tips,
please leave me a comment and I'll ad you at the end of this post.
Thank you!)

My Farmer was a bit concerned when I told him I was making lines
on the counter with these.
on the counter with these.
I have to admit
my kids were quite entertained watching me beat up this counter top.
The noise was rather loud.
But I gave them instructions that this was not a usual situation
I had going on here;
and that they were going to have to forgo any ideas that
they could "distress" any other furniture in the house for me.
I hope they remember that.
I then moved on to these:
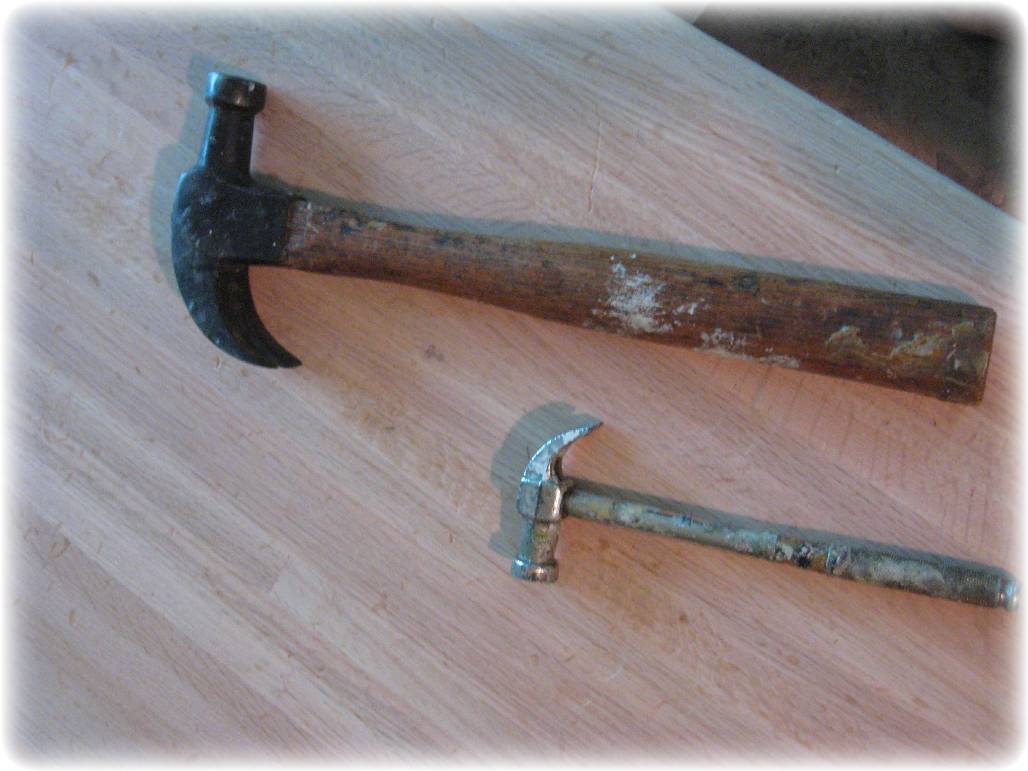
I hammered
and hammered
as hard as I could
until I felt like I was worn out.
I tried to hammer indentations
and hammer on some of the gashes and scrapes
to make them look a little worn down
and not so fresh.
I felt like I was really over-doing the damage,
but looking at the blanket chest
and my counter top,
I fell considerably short
from the scars on the blanket chest.
Next came the fun part:
the staining.

I read on a blog about using coffee to give a more natural stain,
so I brewed up some extra strong coffee
and began to paint it on the counter top.

The smell of the coffee was unbearable;
I had to stop for a coffee break.
I had to stop for a coffee break.
It was enjoyable to paint in my new coffee house
rather than the
rather than the
offensive smell of wood stains.

When I was done with the coffee painting and it was still wet,
I got a little bit of my black acrylic paint
and randomly painted blackened areas to the counter.
The aged wood of the blanket chest looked like this,
and although I'd read on the Internet to use a blow torch
and burn the spots in,
I didn't have a blow torch handy
and my little grill starter gun
just wasn't doing the job.
So painting the spots was my only alternative.

I actually left the coffee grinds on the wooden surface to dry;
some extra spotted staining was fine;
it turned out so light,
it's not noticeable.
Of course, if a person didn't want to deal with the mess
that the grounds made,
straining it before using it to paint would work fine.
some extra spotted staining was fine;
it turned out so light,
it's not noticeable.
Of course, if a person didn't want to deal with the mess
that the grounds made,
straining it before using it to paint would work fine.
I also made sure to stain the edges and under edge of the countertop
by about 2 inches,
so that the overhang will look the same underneath.
I wouldn't want my toddler or dog to see an unfinished counter,
now would I?
When the first coat of coffee stain had dried,
I got my permanent calligraphy ink,
and, using a paint brush,

I marked in spots and lines on the counter,
rubbing them in
so they looked more natural.

I then gave a second coat of coffee stain to the counter
and let it dry.
This time, I brushed the coffee grains off.

Waterlox was the product most recommended
for finishing wood floors and wood counters.

It is tung-oil based.
It was pricey
($35 for one quart),
but one quart was supposed to be able to do the job for this size.
I also purchased three wool applicators that were recommended
(one for each coat)
rather than a brush that would leave brush lines.
I began the first coat.

It has a really strong odor,
but it goes on smoothly and easily.
When it was dry
(I waited 48 hours to be sure),
the counter was not looking as "red" as I wanted;
so after roughly sanding the counter top
for better adhesion when applying the second coat,
I prepared the Waterlox for the counter.
I poured about 1/3 of the quart into a plastic container
and
I poured about 1/3 of the quart into a plastic container
and
added about 1/4 cup
of Red Oak Stain
to it.

The second coat really absorbed into the counter as well...

but the third coat (applied 48 hours later) was the charm!

(Some extra board pieces had been stained and painted as I did the counter
for the back-splash of it.)

This is how it will look
with the back-splash.
I ordered some "Old White" Annie Sloane Chalk Paint to do the
upper cabinets with: no sanding or priming needed!
I got a couple other colors for some future projects as well:
furniture projects to sell,
my bathroom medicine cabinet,
sewing machine cupboard,
bedroom furniture,
and Violet's floor.
Is a house ever finished?

I was a little fearful of getting too carried away with the distressing,
but am happy with the way the counter looks.
but am happy with the way the counter looks.
Let's just hope we can install it without any frustrations.
We have our own set of frustrations right now...
...like the stink bugs that are taking over our house
and stinking us...

...and Violet's spelling.
Linked up to:


I love it.When I was a child my neighbor(6 Yrs old)
ReplyDeletecut the legs off the kitchen table. He's now a surgeon. So if the kids get any ideas about your furniture don't worry they're preparing for their future
You amaze me, and I am not exaggerating! You are such an artist. And I am more impressed than I can say.
ReplyDelete=)
I love this look...I used to have a barn wood dining room table with ladder back chairs---prekids that is....I now use it as a gardening table
ReplyDeleteLOVE IT!!!! You are so funny! I can imagine you with the sock and chain. You did a great job distressing it! Where did you order the chalk paint? Is it a website? I'd like to look at it.
ReplyDeleteGorgeous!!
ReplyDeleteLooks spectacular!!!
ReplyDeleteSimply amazing! It turned out wonderful and I had never heard of coffee used to stain butcher block before. I wish I would have known that before I sold our butcher block island. I had always wanted to darken the top up but never was brave enough.
ReplyDeleteThis turned out so, so well! I absolutely adore it. Thank you for sharing!
ReplyDeleteMJ @ MD School Mrs.
Your counter top turned out beautiful. Great tip to use coffee for stain. I'm going to have to try that.
ReplyDeleteThis is absolutely beautiful! I'm stunned... I'm a new follower, I found you on the Thrifty Thursday blog hop. I'm looking forward to seeing more. I'd love a follow too! :)
ReplyDeleteAlisa
http://asterriskjewelry.blogspot.com/
Beautiful! I love messing around with stains and finishes to make them look extra worn and well-loved too! Great job and thanks for all the interesting tips!
ReplyDeleteGood for you for persevering to get the look you wanted! It's amazing, and your prose is delightful. ;-)
ReplyDeleteI love it. You did a great job! I adore all the vintage looking marks and stains you added to give it a great look. Very well done.
ReplyDeleteI have to tell you, when I saw the coffee grinds and black splotches, my first thought was. Oh no...she ruined it! But the final outcome is gorgeous! I don't know if I would have the courage to try that on something I paid to have made. Well done!
ReplyDeleteAmazing! And I laughed out loud about needing that coffee break... oh how I LOVE the smell of coffee myself!
ReplyDeleteNeat trick with the grounds!
Donna
http://funkyjunkinteriors.blogspot.com/
I came to look at your gardens and they are beautiful. I stayed because of the way that you speak of the things you love or not in the case of the Stink bug. This is a refreshing blog and I am adding you to my blog list so I can come back and catch up on the stories of the Farmers Wyfe.
ReplyDeleteWow~ you did an incredible job! I didn't know the coffee trick- thanks for sharing that! Your counter looks amazing~ would love for you to share this at my weekend party sometime. Well done!
ReplyDeleteI was blown away when I saw the results...I have to admit I was a little skeptical on this project but once again you did it! Just beautiful work and it was work, wasn't it? But well worth it! Love the stink bug sign...please keep them on your road,ok?
ReplyDeleteOh my goodness! That's AMAZING! It turned out so great!!! I love your methods....always glad when you just cross your fingers and hope it works out---and it does! Great, great job!
ReplyDeleteThis turned out so fabulous! If, and when, we do a kitchen remodel, I would like a wooden top on an island but I want it to be distressed like yours. Thanks for all your tips on how to do it. I like your sense of humor, too!
ReplyDeleteI did my kitchen cabs in Annie sloan old white. Come check it out. Your distressed table came out great, and it looked like quite a workout!
ReplyDeleteReally beautiful, thanks for sharing. I hope you don't mind if I share in on my Facebook page.
ReplyDeleteTake care,
Laura
Awesome job you have done on the work surface, love it. Stink bugs we have the same problem!
ReplyDeleteThank you, everybody, for your great comments. :)
ReplyDeleteWow, you put a lot of work into those. I dream of butcher block counter tops. Alas, kitchen remodel is at the bottom of the list. Yours turned out beautiful. I'm stopping by from The Lettered Cottage.
ReplyDeleteWow, that is absolutely beautiful! Very inspiring.
ReplyDeleteI have to say, though, that it is untrue that pine floors cannot last 150 years. There are some pine floors which are well over 200 years old. That doesn't mean yours are original to the house, but they definitely could be.
This is so pretty! I would love to do something like this in our house.
ReplyDelete