Showing posts with label paper crafts. Show all posts

Thursday, December 6, 2012

Paper Origami Stars for My Mantel Swag.


My fireplace mantel was looking like it needed something.

I found this origami star ornament a blogger friend made
and decided I would try making some for my mantel.


They were fun to make, so I am sharing them with you.


 I was a little worried when I started because my attempts at paper airplanes
have been very sad indeed.

But I was determined.


After making three of these stars,
the process became much easier.  I was folding them out like a well-seasoned
department store present wrapper in little time.


Start by having 12 x 12 scrap-booking paper;
cut it into four pieces of 6" x 6".


I took pictures and if you skim down through them somewhat quickly,
it is almost as if you are watching me fold.

Give it a try...


(Unfold)


Now open this second fold up:
this makes an X in the middle of the two folds,
that's what you are after.


This lower right hand corner gets folded up so that the bottom corner
hits right into the X you made with the first two folds.


This piece just folded into the center
then gets folded back over onto itself.


 Now the lower left corner gets folded in...
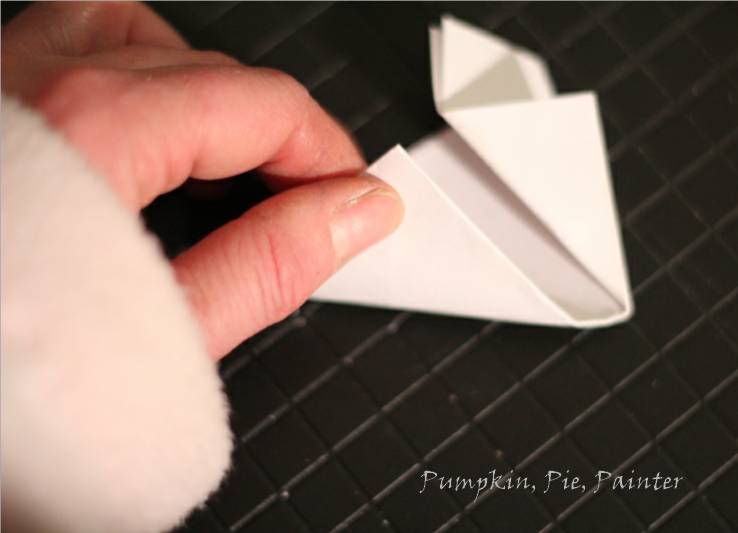


 To line up with the last fold on the right half.


 Now take the left corner piece
and start folding it in toward the center line...


 BUT pick up the first sided fold,


 and fold the second half inside of it to line up with the center.


Then fold the right side over the left side that just went under it.


It should look like this.


 Now get scissors and place on lower half of the folded up star...


 and cut it from the lower edge
up to the upper edge on the left side.


"Wa - La!"


 Open it up...


 Refold the star along the lines so that all the points are coming up on the facing side
and fold down on the back sides.


 Adjust the star with fingers pinching up...


and pushing down on the star while pinching.


I used some thin wire to push through the paper and hang on the jute
(I also spray painted the white ones with silver spray paint.)


Perhaps now that I have mastered the star,
I can move on to grander things like...


Origami castle on display at the exhibition in Umihotaru, near Tokyo, Japan: Model city crafted entirely from paper
Source: The Telegraph: created by Wataru Ito when he became bored during his university entrance exams.

this city: wouldn't my daughters love this;


although my son would prefer something more like this:

 Art, Green Materials, Recycling / Compost, Anja Markiewicz, german art, Nano-Origami, ephemeral art, recyclable paper, biodegradable paper, paper art, paper sculpture, Postdam, origami, origami animals, tiny art,
 Source: Inhabitat.com: Artist Anja Markiewicz folds amazingly tiny nano origami with miniature pieces of paper; these tiny creatures may be purchased.


I would love to accomplish something like this:


Source: by Lisa Nguyen


Although I think my husband would enjoy this:


http://0.tqn.com/d/origami/1/0/C/0/-/-/money-origami-wreath-6.JPG
Source: Origami.about.com: Money-Origami: Learn How To Make A Money Origami Wreath


But really, I am happy with my origami stars.


Linking up to:
Raisinghomemakers.com 
Somewhat Simple, A Crafty Soiree at Yesterday on Tuesday, Thursday Favorite Things at Katherines Corner, Link Party at Centsational Girl, Inspiration Friday At The Picket Fence, The Best Christmas and DIY Crafts Ever at The Nesting Place, Link Party at Craftberry Bush, Feature Friday at Five Days 5 Ways, Clever Chicks Bog Hop at The Chicken Chick


Tuesday, September 25, 2012

Simple Autumn Love: My Fall Mantel.


Can you believe it is fall already?

Where did the days of summer fly off to?


 I didn't climb up to the attic to fetch the fall decorations this year.
I just decided to use some natural decorations
 like the little gourds a friend gave my kids,


the hydrangeas that I dried a few weeks back,


a small fresh tansy bouquet in an old jar,

and some red maple leaves
(these are in the leaf-painted jar I experimented with last week).
The old farm lantern belonged to my husband's grandfather.


The huge picture on the mantel was a crazy yard sale purchase this summer.
I thought the print was pretty,
its fall simplicity and simple life drew me into it,
although the gold strip on bleached wooden frame made it look a bit too 60's,
so I painted the frame white.

The lady holding the yard sale was doing it as a help to her sister
 whose husband had just passed away.  She needed new tires,
and all the proceeds of the sale were going to it.

I found a few things I liked,
and the picture happened to make it into that list.


This old looking slat box was very inexpensive at the Charity Store
because it had another slat coming down that was hanging off.

I pulled it out and found this image at the Graphic Fairy
that I thought might fit well.


 After printing it on tan paper,
I inked the edges with a yellow stamp pad 
and then a brown stamp pad,
with the help of a soft sponge.

 I colored in the wording with a permanent gold marker I had
and then crumpled the whole thing up.


 I was trying to get the paper to have an aged look to it.

 I picked a bouquet of purple beauty berry bush for another old jar.
I have dried them before and although the leaves will wither,
the berries still hold their color for the season.


The decorative candles were a gift from my husband's aunt
and bring fond memories when I pull them out of my candle box.


 It is a simple fall mantel,
but I think simple was a nice change for me.


(If you'd care to join me,
I will be posting my favorite/family recipes for the month of October,
a new recipe every day.)


Linking up to:


Monday, January 30, 2012

A Bit of Love


As mentioned in my last post,
here is the instructions of how I made my Valentine's Day banner for my mantel.

If you don't want to know,
but would like a chance to win a banner,
skim down to the bottom of this post.

If you don't care, I will cry profusely for two days.

No, I'm just kidding.


I found this great idea at The Graphics Fairy:


I purchased some old music books at a yard sale this past summer,
so I tore out some pages that were in pretty bad shape anyway,
and glued them to some cardstock to be used for my background triangle flag pieces.


 I got on Pinterest and looked for a "Love"
that I liked
and found this one:
 Pinterest:
from the great website that sells these and other embroidered pieces by Jan Constantine.
(Thanks to a reader for letting me know where this pillow was from!)
.


I printed it four times,
thinking I might only be able to salvage one letter from each printing,

 but I was able to actually save 2 letters from each printing,
so that is how I ended up with two banners.


After I cut the letters out,
I cut a heart shape out,


It was much bigger than I needed,


so I just kept trimming until I got the right size.

I traced the heart pattern onto white cardstock,
one for each letter,
and then glued the letters on.

They all fit nicely,
 except for the "L",
which was acting like my two-year-old Lillie:
not wanting to easily comply according to the rules.
 

I fixed it by cutting out a portion of the bottom line
where the size seemed most consistent
and then glueing it on the heart with that part over lapping
so it looked smaller.

At this point, I applied matte Mod Podge carefully to the hearts with letters.
I have found this seals printed images.
I have had one too many printed things get wet
and the whole project get ruined by smeared printed ink.
The trick is to modge podge with one swipe across the image.
Too many swipes, and the colors on the image will bleed.
 While these were drying, I set them aside.


I laid the heart pattern onto a scrap of paper

and used a ruler to etch a slightly larger banner size I wanted behind each letter.
I folded my rough flag in half lengthwise and trimmed it,
making it exact on both sides.


This pattern was traced onto the music covered cardstock,
making a flag piece for each heart.

I Mod Podged these music-covered flags because the music paper was very fragile
(one had the date 1918 on it).
 
After the hearts with letters were dry,
 I then applied German glass glitter to the edges of the hearts
using a paint brush and Elmers glue,
and sprinkled on the glitter into a plastic container to catch the stray glitter.

 These hearts were then adhered to the music paper flags
using glue.


When everything was dry,
I found some ribbon I liked,
 
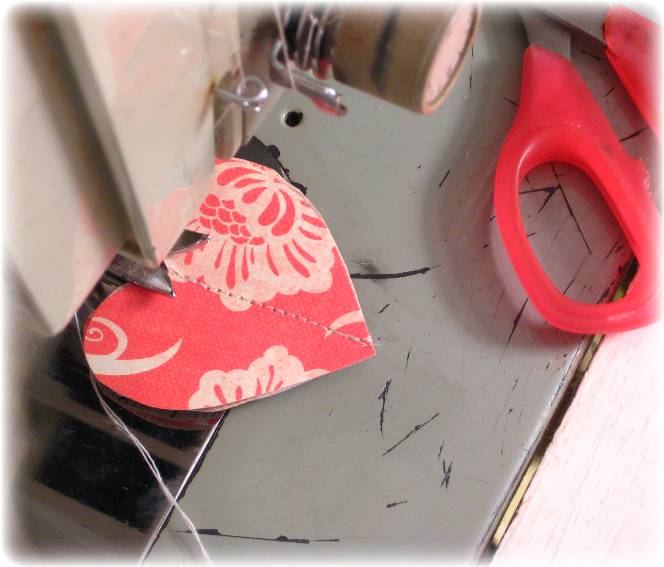
 and sewed the flags to it across their tops.
(I had to touch up a few spots where the glitter was too close and got crunched off
but otherwise, they survived the antiquated sewing machine.)


 I have always wanted to try making these banners;
it was a fun project.
My husband wasn't too sure about the whole idea of the paper banner,
but my daughter had such an enthusiastic response,
she made me feel like it was worth it.
Maybe it's just a girl thing.


This banner looked like a fun idea as well,
but I liked the hearts to stand alone.
 
Pinterest: Cottonandcurls.blogspot.com: Heart-garland


I found some background paper that I liked
graphicsfairy: Wallpaper

and, cutting some scrap-booking paper down to 8 1/2" so it would fit through my printer,

I printed the Graphics Fairy background paper on the back side.


I flipped it, shrunk the print image size
and printed it in the other direction as well,
to better fill the paper up
and for my two sizes of hearts that I wanted to make.
I then painted Mod Podge on the printed background paper.


I also ripped out a few more pagers of the old sheet music
and glued that to the back of another piece of the same red scrap-booking paper.


I cut hearts from all of the two-sided paper,
and then lined them up in groups of three,
some facing all the same direction,
others so that like sides were facing each other.


After painfully trying to find the eye of the needle
(my eyes are not cooperating lately)
I sewed through the middle of the hearts.

I'm a mender of hearts.


The back of the heart looked like this.
Edges were trimmed so they all lined up better.


Separating the heart layers was the last step.


These can be set around just as they are.


 I made this extra grouping below:

they're easy enough to slip into the mail.


If you leave a comment letting me know you would like them,
I will enter your name into a drawing.
I'll pick a name on Wednesday.

This is just a simple giveaway,
so I'm not going to leave it open long.

I'm hoping somebody will prove my husband wrong
and want them in their home.

But he'll say I cheated by saying that.

Now I think I doubled the cheat by adding that part.

I'm going to get myself confused if I keep this up.
I hope these directions weren't as confusing.
You can always ask if you have any questions.

Have a great Monday!

Linking up to:
Graphicsfairy.blogspot.com: Brag-monday
Wearethatfamily: works-for-me Wednesday
Savvysouthernstyle: Wow-us-Wednesdays
Time-warp-wife
Abowlfulloflemons
Aboverubies.net: Domestically-divine-tuesday
Notjustahousewife: Show-me-what-ya-got
Homestoriesatoz.com: Tutorials-tips-link-partyBetweennapsontheporch: Met Monday
House in Roses
Homemaker on a Dime.com
Craftskeepmesane
Bystephanielynn Under the Table and Dreaming: Sunday-showcase-party
Craftskeepmesane: Motivate-me-Monday