Showing posts with label Recipes. Show all posts

Sunday, January 13, 2013

Flu: Home-made Helps


From the kitchen, I can hear Violet "teaching" Levi and Lillie.

For someone who says she doesn't like school,
it is funny that she wants to play it with them.
It makes me feel just a wee bit of pride hearing her repeat things she's heard during school this week,
especially since I didn't realize she was listening quite so well.


She does a great job, too.
Every home-schooling mother should have a Violet in their home.
:)


From the other room, I can hear snoring
with an occasional cough.


 My hard-working farmer has succumbed to the sickness going around:
cough, chills, aches and headaches,
that nasty feeling in the sinuses running down into the chest.

It is pitiful to see him.
He rarely gets sick and I don't think I've ever seen him this bad.


I decided I'd better make up some natural medicines to help him.


The birds got to the elderberries this past season.
I saw they were just about ripe,
and then in just a day's neglect,
nearly 5/6 of the berries were gone.

Still, I managed to save about a cup's worth.
I cut the whole head off the elderberry bush,
stuff them into a plastic bag,
and then freeze them until I will need them.


 Once the need arises, I remove the whole thing from the freezer
and rub the berries off of the stems.
I try to pick as much of the stems off as possible,
and then pour them (one cups worth) into a pan with 2 cups of water,
5  or so whole cloves, 1 heaping Tbs. of  crushed fresh ginger, a stick or two of cinnamon.

The pan is set on a lower setting until it comes to a boil,
and is left to simmer for 45 minutes.

I set this batch on the woodstove,
and, oh, the aroma of the cloves and cinnamon made the house
a festive mixture of sweetness!


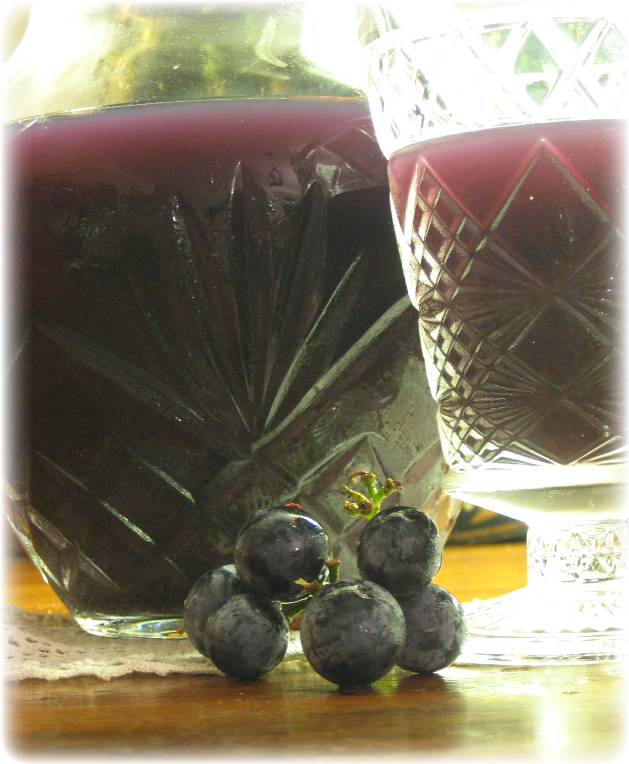
 Once the time is up,
the cooked berry juice is poured through a strainer,
and a cup of raw honey is added and stirred in.


This tasty brew is super high in vitamin C.
It has been shown in studies
that taking elderberry (cooked into a syrup as such
or even using the dried flowers in a tea),


A Tbs. or two is helpful, 
or even a bit in a small cup.


Another great sickness preventor and healer of the cough
is garlic.

I find it rather hard to ingest raw, so I love to buy pickled garlic.


 This variety is super potent because it is mixed with hot peppers,
but it is amazing how it loosens the frustrating phlegm in the throat.

(I usually eat a small piece of bread after eating about 5 cloves of this garlic,
just because it helps it not be too hard on my stomach.)


Elderberry syrup can be purchased at health food stores 
and online if you don't want to go through making your own "medicine".

The dried herbs can also be purchased
and used in tea.


 I make a tea with the elder flowers
as well as mullein leaf


Vitamins are a beneficial help to everyday living,
but these are some extra measures that can be taken to protect health.


I'm hoping my farmer is feeling a bit better soon.

It's never fun to see a man sick,
especially when it falls on a weekend.


You can purchase dried elderberries to use to make this syrup
from Mountain Rose Herbs
or from Bulk Herb Store
or your local health food store.

(If you cannot find elderberries,
I also use this product and find it very helpful).

*(Please realize that I am NOT a doctor and I only share this information
as something that I find helpful for my family; some herbs need to be taken with caution,
such as garlic, because of the contradiction they can cause with other medications).*


Linking up to:
Gnowfglins.com

Monday, October 15, 2012

Crockpot Lasagna: the Secret Ingredient


My Farmer loves the crock pot.

He likes when meals are cooked in one dish
so there aren't tripping hazards and towers when he comes in for supper.

He also likes a good lasagna,
so I set about to find the perfect crockpot lasagna.

There are a lot of recipes out there for crock pot lasagna,
so I tried a few,
gathered the recipes together
and combined what I like
with what I wanted changed:
one was too dried out, the other, too much liquid.

I also used some different cheeses for my final recipe run,
and my Farmer was impressed.

So here's how it went:

The ground beef, onion, and garlic got cooked up together in a skillet first.


While that was going on,
I got my cheeses ready:
mozzarella,  farmers' cheese (made by a local Amish woman), 
Parmesan,
and,
the surprise ingredient:
plain yogurt.

(Of course, if you do not have or want to use the farmers' cheese and yogurt,
you can substitute the same amount of Ricotta)
 These cheeses got an egg and some parsley mixed into them.

Once the ground beef was cooked,
the layers were put into the crock pot:


a bit of sauce,


some of the meat,


 4 noodles,


cheeses.


And then repeat,
in that order...


or similar
(sometimes I mix the order of the meat and sauce,
because I am a rebellious lasagna maker),


until you have three layers of four noodles.


I start my crock pot out on high to get it going for a while,
and then turn it down to low;
but you could just cook it on low
or high
and not be difficult about it like I am.

It is good to let it stand when it is finished for 10 - 15 minutes:
the noodles have time to absorb more of the juices this way.


I usually always try to get a finished product shot,
so you can see how wonderful it looks,
(or maybe not,
 as my sister informed me about my beef tongue recipe,)
but I forgot about my poor lasagna;
and when I remembered,
all there was left was this:


Maybe this is a good though?

Do you have any secret tips for lasagna?


This is part of my 31 days of blogging series.


Crockpot Lasagna

Saturday, October 13, 2012

A Prized Possession: Grape Juice


I could see her as she stepped from her house,
her face questioning why I was there.


"I was told that you might have some grapes I could buy?"


God provides the little things.
I am not sure why it always surprises me that He does.


We have been on a slow journey toward trying to eat better.
I say slow because it takes time, money, and gaining knowledge
to eat better in a world where there is so much to be learned
about the intricacies of our bodies
and how everything works together.

And then, of course,
it isn't an easy thing to completely change instantly.


Ten years ago,
when I heard some of the many things I know now about eating in a more healthy way,
I had a really bad attitude about it.

Not that that is unusual or anything, 
as I'm sure my Farmer can attest.
I don't like change,
and I like sugar and easy foods.

But I know that anything worth doing
often takes effort and sacrifice.
So I have tried to alter the most dangerous things we eat
and work on the new knowledge I seem to constantly bump up against
as time and issues demand.

And so I went about asking God to help me find some natural grapes
so I could can some healthy juice for us.
Our grapes have not done well yet.
We get a few handfuls, but not nearly what we need to make juice.
I am a very poor grape vine trainer as I just can't seem to grasp the best way to prune them.
I hope someday to understand them.

I went to the Amish produce auction and asked if they ever had any grapes for sale
that hadn't been sprayed by harmful chemicals,
and the auctioneer directed me to this woman.

As I paid her, she seemed happy;
she told me she had processed six times the amount she had sold to me
and still had more to pick.
When I asked her how she had processed them,
she led me into her home and jotted down while she explained the recipe to me.


I came home happy to have the grapes,
and interested to see how well her recipe would turn out,
 a recipe taught to her, an older woman, by her mother-in-law.

So, here is how it is made:

After the grapes were sorted so that only the good ones were used,
I added water to the grapes before smashing,
as she specified,
and then smashed the grapes and added the sugar.


Having a food mill is essential for this recipe,
but I don't know how I would live without my mill anyhow
as I use it for applesauce, tomatoes, and grapes.

For the grapes, a shorter insert is used
because the seeds would jam it up.


It is done just as the tomatoes were done
except the grapes are fun through before being cooked.
Also, I ran the grapes through the mill two or three times,
until the pulp was too thick and was jamming the mill.


(Although, I found the ketchup was made thicker and less wasted by running it through the mill 2 or 3 times as well.)


After it was milled, the grape juice was heated to a good boil
and then put into sterilized jars with sterilized lids.

I found that they sealed on their own,
but processing would be wise if you are worried about them at all.


We have found this recipe to be the best so far:
less waste, and the juice is concentrated:
2 - 3 jars of water may be added to one jar of grape juice.


It proved to be a good savings to make the grape juice
as organic grape juice is pricey.


It is a step toward eating and drinking better quality food,
and I am thankful for the steps...


especially when they are as rewarding as this.


Linking Up To:


See my other recipes from the 31 days of recipes for the month of October.


Grape Juice Concentrate

Wednesday, October 10, 2012

A Race and A Recipe: Beef Tongue


"Come take a walk with us around the new fence."


We have been saving and waiting for the time to fence this back field
so we can utilize it better by the cows in the fall and winter.


 I love the view from up here.

"The heavens declare the glory of God;
and the firmament sheweth his handywork."
Psalm 91:1
That verse seems to shout in my head whenever I see nature that takes my breath away.
 It makes me thankful to look out over this spot He has given us
for this time in our lives.


"We want to race, Mom.
Come race with us."


"Tell us 'Ready, Steady, Go!' "


"Okay.

READY.

STEADY.

GO!!!!"


I love taking walks in the cooler weather.


What better way to follow up a walk then with the kids' favorite meal.


Okay, yes, I know this may sound crazy,
but my kids love beef tongue.

They've grown up on it
and they don't see it as any different than any other part of the cow
that we eat: hamburger, steaks, roast;
to them it is just meat,
very tasty, soft meat.


Here is how I fix it.

After scrubbing the tongue with a kitchen scrub brush,
I submerge the tongue in a pot of water,


and pour in some pickling spices and 2 bay leaves.


I then bring it to a boil
and then simmer it for about 4 hours.

It can be done in the crock pot as well,
on high for about 5 or 6 hours,
or on low for about 8 or 9.


When it is done,
it is taken out of the water to cool.

When sliced, the skin peels right off,
super easy.


The tongue is then sliced into thin pieces,
which the kids gobble up like candy.

We rarely have much left over with the three of them
and us two trying to get our share.


My husband likes his with horse radish.

I prefer mine with just a dash of salt.


The meat is so soft and tender,
it really can't be beat...


and that's a fact coming from a household of ready racers.


Thank you so much for your comments.
I have enjoyed hearing what you are having for dinner
and the recipes you have shared as well.


This is part of my 31 days of blogging in October.


Linking up to:
Wearethatfamily.com
Blessedwithgrace.net: Tempt-my-tummy
Aboverubies.net
Womenlivingwell.org
Kelly's Korner Main Dishes Link-Up.

Beef Tongue

Tuesday, October 2, 2012

Slippery Chicken Pot Pie: A Must.

Chicken in broth with home-made dough:
what a comfort food.

This recipe came to me from my Mother-in-law,
a family recipe.

Cooking this in the fall is a must.

A must, I tell ya.

Here it is:

 Cook some chicken in water for a few hours
( I take the skin off).
It does well when added with the little bit of onion,
a Tbs. of dried parsley,

and I add a minced garlic clove and a Tbs. of kelp.
I add kelp whenever I can because it is a powerhouse of a seaweed.
(I also used 1 Tbs. of celery seeds because I didn't have any celery.
It tastes fine, so I am hoping since it has the word "celery" in it,
that makes it a justifiable substitute...

hoping.)


The chicken will turn into pleasant parcels of tender meat
and the liquid will be ready for the next step.


Add some bouillon to taste
(or ad broth and 1 tsp. of salt, as I did).


While the broth commences to reach a boil,
get your choice of potatoes chopped up:
I chose 6 large red potatoes
and I left some of the skins on
as they are nutritious.


At this time, it is good to get the dough made, as well.


1 1/2 Cups of flour,
1 tsp. salt,
3 Tbs. shortening
(I used a mix of butter and coconut oil)
are placed in the food processor for speedy mutilation.

In order to add a punch of nutrition to my unsuspecting children,
I threw in a leaf and a couple of stems of Swiss chard in with the dough.
I just cut the amount of water I added,
and it worked well.


This is the consistency we want.


The dough gets rolled out on a floured surface.
(Don't look too hard: I forgot to flour my surface,
but it didn't want to stick today, so I didn't notice this misstep until now.)

With a butter knife,
cut some strips into the dough.


It is a pretty shade of green, isn't it?

My son and daughter love dough,
so they were begging me at this point.

They said that green dough is just as good as yellow,
and they are definitely the experts to be consulted on the state of doughs.


When the broth is boiling,
alternate adding a layer of dough
and then a layer of potatoes,
always waiting for the broth to boil in between layers.

It won't take long.


The cooled off chicken can be torn to bits...


and added back to the pot when the potatoes are cooked
and the Pot Pie is just about done.

A few heaping Tablespoons of flour mixed with a little water
may be added to thicken up the broth.


The Slippery Chicken Pot Pie is now ready
to provide comfort to a hungry cook and her village...
the ones in her house, anyway.

It may be eaten as it is,
or it is enjoyable with a half teaspoon of horse radish added to individual bowls.
I know this sounds a bit rash,
but try it and see.

You may be amazed at this quirky addition;

I know I was.


Below is a printable recipe card
if you would like to give this bowl a try.
(The parts in parenthesis are my alterations to the recipe.
You may or may not chose to work them in).

Come on back for more of my favorite recipes
as I fill my blog with them for the month of October.


Linking up to:
Theprairiehomestead.com
Funkyjunkinteriors.net 
Betweennapsontheporch.net
Abowlfulloflemons.blogspot.com
Cozylittlehouse.com
Gnowfglins.com


Slippery Chicken Pot Pie