Showing posts with label Vintage. Show all posts

Tuesday, September 4, 2012

Glue-Gunning for Texture


While digging out the tomatoes from the case I purchased at the produce auction,
I came upon a catalog
used to ad more stability to the opening at the base of the box.

Lo and behold,
it was a "Country Door" catalog.

Oh, how I love the "Country Door" catalog,
but it stopped coming to my home some time ago
when they realized I was only a window shopper.

So I promptly sat down,
thanked the woman who had chosen to pack her extra tomatoes
in the lap of such a luxury for me!


I came upon this image...

Countrydoor.com

and forgot about tomatoes.

Something about these detailed mirrors beckons to me.

I saw several of them in the latest issue of Romantic Country as well
(a fabulous magazine gifted to me by my mother for my birthday
and devoured when it shows up in the mailbox).


I wanted one for my bedroom,
and decided to try to create the effect
using a plain mirror I had that fit perfectly in the space where I wanted one.

To begin the transformation, I dug out my glue gun,
a ruler and pencil,
and some paint.


(FYI: the red stripe is a streamer across the ceiling left-over from my daughter's birthday celebration,
not a "No Decorating Mirror" sign.)


I measured off how far I wanted each decorative segment to be,
which for this piece
was 1 1/2". 


Using my heated glue gun,
I then proceeded to make arches around the frame,
being sure to use an adequate amount of glue
and that the glue gun lightly pressed the glue onto the wood
to ensure good adhesion to it.


As you can see,
perfection with a glue gun is not my specialty;
but I figured when painted, the errors of my glue-gun doodling skills
would be more forgiving.


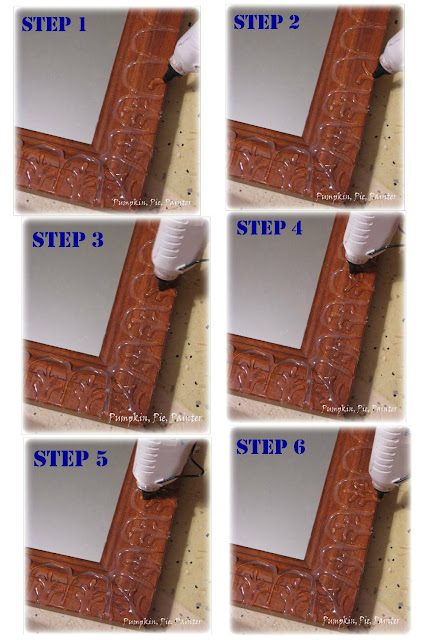
I then filled in the archways with the decorative image as follows:

(Step five starts at the top and proceeds in a downward motion,
which is shown completed in step 6.)


After completing the whole mirror
(I used approximately one and a half of the 10" long glue sticks),
I began pulling off the glue gun threads.


I set the mirror aside and went to bed,
partly because it was late
and partly because I wanted to be sure the glue cured well.


I chose a base-coat paint that I liked for my room
(any color may be used, of course)
and then carefully painted the whole thing.


I let this dry and then cure for several hours as well.


The white I chose for the top-coat was watered down slightly
(actually, I made mine too runny and I had to thicken it;
so be careful doing this step:
 just a teaspoon of water per 1/2 cup of paint should do it.)


After I painted a side,
I'd lightly wipe it off so that the under coat would slightly show through.


I wiped more off the inside margin.


I sealed it all with a coat of glossy Mod Podge.


The mirror helped fill the spot above my newly painted black and white cupboard
and I like the textured look it now has.


I am still waiting on a better lamp shade for my crystal lamp;
the glass globe is a temporary fix as it doesn't properly sit on the lamp.


I had experimented with the glue gun texture on a little storage box for my daughter
that was gummed up on the lid with wax or something else that wouldn't budge.

Of course, that box ended up being her colors...
I hope to share it soon along with her completed dresser.


But of course,
I was a bit selfish and wanted to show you my room project first.

Now I must be off to finish the last batch of tomatoes...

Monday, February 27, 2012

Faux Vintage Watering Can


If you're part of my blog facebook page,
you know I just posted a link to plants that help filter the air
in your home.

Here is another link that includes some others.  
> Best-air-purifying-plants <


I love plants anyhow,


so knowing that they help clean the air


is an added plus.


 It's good to know for my husband's sake,
 as well:


I think he grows a bit weary of the green, leafy indoor residents...


 encroaching upon every window sill of our house.


 One problem I did have
was watering them

I usually resorted to filling a canning jar
and making numerous trips,
a towel as an accompaniment
for the regular spills I seemed to make with it.

I wanted a vintage watering can,
but the ones I found on Etsy usually had holes in them
or just weren't what I was looking for.

I found one at an antique store I loved,
but the $35 price tag and badly chipping paint
turned me away in disappointment.

 When I found this perfect-sized metal one


 for this price and at this place
 
 I decided to attempt a faux vintage watering can.


I grabbed some gloves and this half roll of multi-purpose putty


 and set to molding it to cover the embossed Burpee logo.


 I used a bit more to add some character along the spout,

and a little decorative trim across the handle.


( The hanger from a picture was the means of the detailing along it.)

 To give the watering can an old look,
I used this process,
as I did for the plastic pumpkins back in the fall:

2 to 3 parts Paint to one part plaster of Paris.


The amount depends on how thick of a paint one wants.


Stirring it up and looking at the resulting thickness is all that is needed.

 One could add the plaster of Paris right into the color of choice
for the watering can,
but I just used this paint I had already mixed for another project
and then painted the watering can the color I wanted when it was dry.
( Yes, paint mixed with plaster of Paris can be saved for other projects as long as the lid is applied well).


While the paint dried,
I went to the Graphic Fairy website
and found a few images I loved
that would fit the sides of my watering can well.
 
 After printing them carefully onto tracing paper,
I let the ink dry well,
then cut the images out,
leaving a small border around them for taping purpose.

I taped the image to something I wouldn't mind getting a bit of Mod Podge on,
 and then Mod Podged them quickly,
only brushing over the image once so as not to cause the printer ink to run.

 After a day or two to make sure the watering can was thoroughly dry,
I applied some Mod Podge to the place on the watering can where I wanted my image,


 and carefully tried to rub any air bubbles and wrinkles out.
Obviously, it was impossible for me to get all the wrinkles out,
but I didn't mind this look, so I left it alone.

 I added some flower designs around the images.
 To finish it off,
I painted and then buffed some clear Fiddes and Sons wax
with just a touch of some Rugger brown wax mixed in.


 My watering can is not truly a vintage can,
 But it sure beats a canning jar,
especially since I don't make such a mess with watering anymore.


Happy day to you,
and thank you for stopping in!


Linking up to:
 Keeping it Simple:Motivate me Monday
Betweennapsontheporch.blogspot: Metamorphosis Monday
Graphicsfairy.blogspot.com

Tip Junkie handmade projects


Thursday, February 9, 2012

When My ADD Causes Fires in the Kitchen.


 Do you find as you are blogging,
or reading blogs,
that your opinion and tastes in things change?
Some days, I want to throw in the whole house
and start all over...
somebody back up a few semis and start shoveling this stuff out.
I want a new start, clean, uncluttered, no dirt.
Lovely!


I've noticed with blogs, that most blogs have a theme:
cooking,
decorating,
farming,
health,
fashion,
mothering,
photography,
couponing/saving money,
politics,
devotional type,
writing,
or how to blog itself.

I am sure I am probably missing a dozen or so other categories.

A while back, I won a consultation with a successful blogger
on how to better my blog.

One of the things she asked me was,
"What is the central theme of your blog?"

I felt like I was admitting that I had ADD.

I couldn't pin the one thing down that I wanted to commit myself to.
I love decorating and painting,
but I don't feel like I'm exceptional at it,
nor do I want to devote my blog just to it.

I love health and trying to eat right,
but I'm just too dumb unknowledgeable overall to commit to that.

Photography - Ha!
I groan when I see my pictures compared to really good pictures.

Cooking: I do it because I have to
and I do love sharing recipes that I find exceptional,
but...

Do you know how many flops I cook?

Let's just say that a blog with
"Now here's a recipe you don't want to make"
wouldn't be a favorite of mine either.

I can't.

I can't commit to one thing.

I love writing.
It is like singing in my soul.

But I'm not deep enough to fly on the wings of verbosity 
every day of the week,
to spout off intellectual extravaganza
as much as I'd like to.
The truth is

(I am so sorry for this)

I deal with too much poop in my life:

cow, kid, kid, dog, cat, kid, kid.

The other day, I just wanted to don a raincoat,
wrap a diaper around my head,
and go conquer my world.

The fact is:
I think that waxing eloquent needs a better breeding ground.


I'd love to write about God everyday
and what I'm learning and need to learn.
I admire and love reading these girls who speak so beautifully
and cheer me on to get my focus right.
Sometimes, oft times, I just would feel like too much of a hypocrite.
I can't write peace when I am chasing a tornado,
the weather in our house isn't always sunny.
Somedays, I just need to be silent
to hear God tell me what I need to hear.
Sometimes, as much as I sit down and write,
the words in my heart are mine alone.

And so, as with all these things,
I have also come to realize that
as beautiful as so many of the blogs I run into
(and I wish I could get around to so many of them more)
and as amazing as so many of the homes are that I see,
I am finally discovering what I love
in my home and life,
and I am going to embrace that.

Do you know what?
It is such a relief.
That baffling question of
who are you and what is your blog about
has been settled for me:

Welcome to my ADD blog.

And I can still admire you all for your incredible ability to stay focused
and love what you do.

Hopefully,
when you visit,
I'll be serving up a dish of your interest
when you open the windows to my life.

And hopefully,
it won't stink.


 And so I present you with my black cereal cupboard.

How is that for an ADD twist?

Stone houses don't have a lot of built in cupboards,
so it was a Craig's List buy a few years back.
 It is a neat old piece,
but it had some weird white stains on the black paint on top
and the darkness in the corner where it is
needed some life.

I love life.


 I created some stencils from images I found at
the Graphic Fairy...


and using the method I explained


I applied the stucco, pulled the stencil,
let it dry for two days,
and then painted the whole cupboard
with three coats of red.


RED.


It's called something "Fire" red,
I remember.
The paint dripped on the label,
but the "Fire" part should be enough.


Hope I didn't burn your eyes.


When it was dry,
 I painted some red mixed with green shading inside the roses,
 complimentary colors.


and then added colors to all the raised parts,
 as well as some stringy vines painted directly on the red background.


I then added some darker green accents.


I waited a day to let the colors dry well,
and then waxed the whole thing with Rugger Brown Fiddes and Sons Wax,
brushing it on in strokes.

I did a heavier coat on the inside panel,
doing circular strokes for a smudged look.

After it dried,
the wax was rubbed to give it a sheen.


 I wasn't sure when it was done
if I liked it:

It is so drastic.

But as the day went on and I looked at it where it is,
I liked it more and was uncertain less.


It is definitely better than the old black
and seems to call out to the other red accents in the kitchen.


And when I look in from the living room
with the walls I just painted,
I like it even better.
But I'm going to show you the living room another day.


Be sure to check out this fantastic giveaway:
$75 your choice of jewelry
from the fabulous Etsy shop "Form and Function"
going on right now!


Linking up to:
 thediyclub.com
Wearethatfamily.com
  Savvy Southern Style 
*Blue Cricket Design
*Be Inspired - Room to Inspire


Astrollthrulife.blogspot.com 
Graphicsfairy.blogspot.com: Brag-Monday 
 Hiphomeschoolmoms.com
Abowlfulloflemons.blogspot.com
Northerncottage.net
 Sassysites.blogspot: Trash-to-treasure-Tuesday
Betweennapsontheporch.blogspot.com: Met Monday 
Theprairiehomestead.com: Homestead-barn-hop 
Thebettermom.com: Better-mom-Mondays 
Funkyjunkinteriors.blogspot.com
Sixsistersstuff.com
Howsweetthesound
Craftenvy.blogspot.com
Be-different-act-normal.com
Fivedaysfiveways.com