Showing posts with label German Glass Glitter. Show all posts

Monday, January 30, 2012

A Bit of Love


As mentioned in my last post,
here is the instructions of how I made my Valentine's Day banner for my mantel.

If you don't want to know,
but would like a chance to win a banner,
skim down to the bottom of this post.

If you don't care, I will cry profusely for two days.

No, I'm just kidding.


I found this great idea at The Graphics Fairy:


I purchased some old music books at a yard sale this past summer,
so I tore out some pages that were in pretty bad shape anyway,
and glued them to some cardstock to be used for my background triangle flag pieces.


 I got on Pinterest and looked for a "Love"
that I liked
and found this one:
 Pinterest:
from the great website that sells these and other embroidered pieces by Jan Constantine.
(Thanks to a reader for letting me know where this pillow was from!)
.


I printed it four times,
thinking I might only be able to salvage one letter from each printing,

 but I was able to actually save 2 letters from each printing,
so that is how I ended up with two banners.


After I cut the letters out,
I cut a heart shape out,


It was much bigger than I needed,


so I just kept trimming until I got the right size.

I traced the heart pattern onto white cardstock,
one for each letter,
and then glued the letters on.

They all fit nicely,
 except for the "L",
which was acting like my two-year-old Lillie:
not wanting to easily comply according to the rules.
 

I fixed it by cutting out a portion of the bottom line
where the size seemed most consistent
and then glueing it on the heart with that part over lapping
so it looked smaller.

At this point, I applied matte Mod Podge carefully to the hearts with letters.
I have found this seals printed images.
I have had one too many printed things get wet
and the whole project get ruined by smeared printed ink.
The trick is to modge podge with one swipe across the image.
Too many swipes, and the colors on the image will bleed.
 While these were drying, I set them aside.


I laid the heart pattern onto a scrap of paper

and used a ruler to etch a slightly larger banner size I wanted behind each letter.
I folded my rough flag in half lengthwise and trimmed it,
making it exact on both sides.


This pattern was traced onto the music covered cardstock,
making a flag piece for each heart.

I Mod Podged these music-covered flags because the music paper was very fragile
(one had the date 1918 on it).
 
After the hearts with letters were dry,
 I then applied German glass glitter to the edges of the hearts
using a paint brush and Elmers glue,
and sprinkled on the glitter into a plastic container to catch the stray glitter.

 These hearts were then adhered to the music paper flags
using glue.


When everything was dry,
I found some ribbon I liked,
 
 and sewed the flags to it across their tops.
(I had to touch up a few spots where the glitter was too close and got crunched off
but otherwise, they survived the antiquated sewing machine.)


 I have always wanted to try making these banners;
it was a fun project.
My husband wasn't too sure about the whole idea of the paper banner,
but my daughter had such an enthusiastic response,
she made me feel like it was worth it.
Maybe it's just a girl thing.


This banner looked like a fun idea as well,
but I liked the hearts to stand alone.
 
Pinterest: Cottonandcurls.blogspot.com: Heart-garland


I found some background paper that I liked
graphicsfairy: Wallpaper

and, cutting some scrap-booking paper down to 8 1/2" so it would fit through my printer,

I printed the Graphics Fairy background paper on the back side.


I flipped it, shrunk the print image size
and printed it in the other direction as well,
to better fill the paper up
and for my two sizes of hearts that I wanted to make.
I then painted Mod Podge on the printed background paper.


I also ripped out a few more pagers of the old sheet music
and glued that to the back of another piece of the same red scrap-booking paper.


I cut hearts from all of the two-sided paper,
and then lined them up in groups of three,
some facing all the same direction,
others so that like sides were facing each other.


After painfully trying to find the eye of the needle
(my eyes are not cooperating lately)
I sewed through the middle of the hearts.

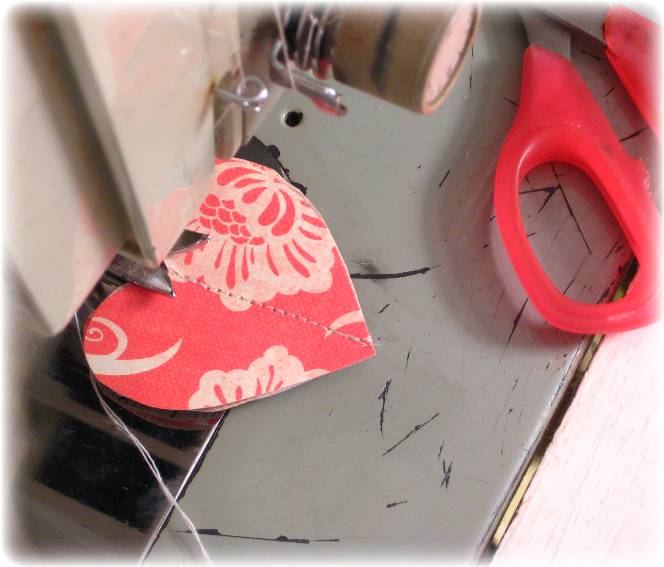
I'm a mender of hearts.


The back of the heart looked like this.
Edges were trimmed so they all lined up better.


Separating the heart layers was the last step.


These can be set around just as they are.


 I made this extra grouping below:

they're easy enough to slip into the mail.


If you leave a comment letting me know you would like them,
I will enter your name into a drawing.
I'll pick a name on Wednesday.

This is just a simple giveaway,
so I'm not going to leave it open long.

I'm hoping somebody will prove my husband wrong
and want them in their home.

But he'll say I cheated by saying that.

Now I think I doubled the cheat by adding that part.

I'm going to get myself confused if I keep this up.
I hope these directions weren't as confusing.
You can always ask if you have any questions.

Have a great Monday!

Linking up to:
Graphicsfairy.blogspot.com: Brag-monday
Wearethatfamily: works-for-me Wednesday
Savvysouthernstyle: Wow-us-Wednesdays
Time-warp-wife
Abowlfulloflemons
Aboverubies.net: Domestically-divine-tuesday
Notjustahousewife: Show-me-what-ya-got
Homestoriesatoz.com: Tutorials-tips-link-partyBetweennapsontheporch: Met Monday
House in Roses
Homemaker on a Dime.com
Craftskeepmesane
Bystephanielynn Under the Table and Dreaming: Sunday-showcase-party
Craftskeepmesane: Motivate-me-Monday

Saturday, December 10, 2011

Trees, Scissors, Paper.


I've had so much fun looking at some of the blog parties:
mantels,
vignettes,
recipes.

Inspiration seems to abound all over the place at Christmas time!

Christmas dinner will be at my house this year:
Usually, we go to my parent's house,
but since the porch is enclosed now,
we have a nice place to feast.
It will be fun to relax and play games in the early evening
and not have to hurry home to feed the cows
the way we usually have to.


Of course, I'm just a little bit excited about the idea of
decorating the porch for our Christmas dinner.

Not wanting to spend a lot of money,
I started with some ideas I'd seen on blogs,
as well as some beautiful images from The Graphics Fairy.
 I love what I've seen with canning jars this season:
waterless snow-globes with little Christmas trees.


I adapted this idea for some flying birds.
In my editting program,
I cut and pasted and reversed some of the images of the bird I found,
cut them out,
pasted thread between two opposing birds,
then glue-gunned the other end of the string to the top part of the jar.


I also glued a bit of blue glass glitter on the birds.
 

 Along with the jars of birds,
I printed out a few of the vintage images I liked,
glued them to some pretty scrap-booking paper,
and then put them into some contact paper
to keep them from getting dirty or wet.


I put a different image on the front and back...
 to make it a little more interesting.


Using things that I already had,
 along with a few inexpensive ornaments I found
made the table look festive and ready for Christmas.


The idea of putting epsom salts in the base to look like snow
was one that I read on somebody else's blog.


 I found these fun clear glass pieces at the Salvation Army,
along with the red glass votive holders
for a small cost.
 They made a different alternative to the snow-globe look,
but I was so happy to have them as I thought too many canning jars on the table
might look too predictable.


For the centerpiece,
I found another glass dish stand at the Salvation Army
and paired it what a tall glass container I found.
It has a lid that screws on,
so I put the bulbs and a golden bead garland I found in it,
screwed on the lid and put it upside down
on the other glass stand.

It feels pretty secure,...
so I added some epsom salts 
to  hide the lid.

The tall glass jar ads some nice height,
and I'll use it to store my spaghetti
when it's festive days are over.


 Of course,
the colorful sparkling trees are my favorite part.

To a few plain green bottle brush trees that I had and didn't like,
I changed out the bases to old wooden spools,
cut them into different sizes, layering the branches
and added white paint and glitter.

To the red trees,
I just added some glitter to their bases to liven them up.

 I love the variety of the trees!


I am so thankful for other blogs,
for women who share their creativity and fun, 
inexpensive ways
to make the four walls of our houses...
 into fun, festive homes!

Tuesday, November 29, 2011

Making "Vintage" look Ornaments.


Hi, again!
Thank you for all the fun comments about my white painted Christmas tree!
You always know how to make me smile!

Now, I'll briefly show you how I inexpensively adorned it.


I had purchased these ornaments in packets of six to ten
at the dollar store.


I'd used what I needed on wreaths
(that I hope will sell during the last weekend of craft sales.)


And then...
(...Oh, please, don't think I am completely intoxicated by this chalk paint stuff.
Really,
I do think of other things during my day)...

I whipped out my 'Provence' Annie Sloan chalk paint,
and brushed a coat on the bells that were left.
 After they were dry,
I waxed them with rugger brown wax,
and they took on a very nice "old" look.


Wanting some variation in shape,
I remembered I had a bag of old thread spools,
and,
after painting them a coat of mossy green,
I painted some glue on them...
and sprinkled some 70 grit German glass glitter,
another really fun product to use.
(Of course, any glitter works for these ornaments;
I chose the German glass glitter because it has the "antique" look I was trying for.)

I found some old crystal lamp pieces
in my endless supply of "someday-useful-things,"
(a much nicer term than my Farmer"s some people's description: "junk",
don't you think?)
and added them for fun.

At the Open House Craft Sale,
I found these quaint, old-looking stars.
I bought the two that they had,

and wanting more,
but not having any,
I thought I'd just ad some star shapes to fill in.

I had some simple wooden star shapes
in my supplies,
and after the silver paint I used had dried on them,

they got a pretty coat of German glass glitter,
but in 90 grit.

The silver is my favorite.
 

It instantly ads an "old" look to anything it is added to.


The wooden snowflake I had
was dressed in the silver glitter as well.


Finding a bag of little snowman light caps for $1
at the charity store was a fun surprise.
My daughter had them on the tree
before I even figured out where the bag of them went.


All of these ornaments came together in a nice way,
and most of them were things I already had
or
they didn't cost much at all.
 Stars seem to be a theme in my Christmas decorating this year.

Do you decorate around any themes for Christmas?


Even the string of lights we found on sale after the 4th of July
fit well,
and it wasn't a planned idea.


Yes, they were a different color for the 4th of July,
 but chalk paint even works on starlight and electric cords;

but I'm not going to tell you about that...

so you won't think I dream in chalk paint.