Showing posts with label sewing. Show all posts

Thursday, June 6, 2013

"C"


"The three P's for the week."

Yes, I know this post is titled "C".

The three P's refer to my blog name:
I will post about something Pumpkin, meaning something from the farm, garden, you know, growing around here.

Next I will post something Pie, meaning kitchen related: food, kitchen, edible or decorative, etc.

Finally, I will post something Painted, or something I've created with my hands that will involve artistic materials of some type.

So there is the explaination of my subtitle,
clearly.

So today, because I wanted to join Jenny's blog fun of writing from a certain letter of the alphabet,
I will narrow this attempt even more by posting the three categories and they will start with the letter C.

Are you confused?
Confused.
 That starts with "C."
See?


1.

The letter "C" for the Pumpkin/Farming category:


Clematis.


My clematis are blooming, or at least these two are.

I love seeing these and forgot that I had decided to plant the 'Red Cardinal' clematis with the white one last summer.


I concede that it was a chipper choice to be made conscious of.


 2.

For the Pie Category today: I am talking edible in the kitchen.


Can you see it?


The kids and I have been checking them.


Others have been checking them, too.

Did you know that cows are curious.

Annoyingly.


Although they are pretty cute, too.


Yes, see.  He's checking out how far along the mulberries are, too.

We're all impatiently checking these countless candy-like clusters of suspended mulberries.

Ripen up, little creatures!


3. 

In the painting category,
I have just that to share: painting.

Ceiling panels from the barn roof that blew off in last fall's hurricane...
(okay, so they are roof panels, but I had to get the C in there somehow).

My super-duper-handy-recycling-penny-pinching-cents-smart farmer rehung the old panels on the back side of the shed that was rotting from too much water spray and lack of sunshine.

Corroding.


 I consciously chose to count this creativity-curtailed cause a commanding challenge.
To cut to the chase: 
I chunked the fun painting for chores.


Once that was done, I mixed some of the paint that was left with a bit of left-over black from another project,
added some floor texture,
and clomped on over to another chore that had been calling.


 These ummm....

uhh...

hmmm...

chippy children climbers that are cantankerous...


for their cutting creases containing chards of chips that cause crying when creeping into feet of children.


Corrected!

If your eyes happen to wander up to the crest of the porch, 
you will notice couch cushions helter-skelter.

Cushion chaos.

Cranky old cushions had seen too much weathering
and then the puppy last fall made certain I would have to recover them this season.


The fading strapping under the cushions became easy teethers for chumpy pup as well.

My clever creative man found this heavy lawn seat type strapping
and is carefully counting the measurements, cutting, creasing, and continuing his countless ways he's come up with cure-all ideas from his comprehensive collection in his many cabins 
(sheds: cabins was all I could come up with)

(maybe man-caves would have been better).


 >CLAP<>CLAP<>CLAP<>CLAP<>CLAP<


Cushion material has been purchased and curtain call will be coming soon!
(Confidentially, the cushion coverer is mentioning this to coerce herself into the sewing chair.)


And so I leave you,
with a certain sweet photo I cherish of my most current walk with child.


 Joining Jenny's blog party on the letter "C"

Saturday, November 3, 2012

My Basket Dressed in a Sweater.


Don't you love a good sweater?
I have a hard time parting with a sweater if it feels like good quality,
but I know they must be moved along sometime.

If they are the type that never look pilly, worn, or mis-shaped,
they could always be transformed into something else.

I have seen some clever uses for recycled sweaters,
so I decided to use a sweater I had to try to save a basket.


After cutting off the arms
(oh, that sounds so horrific),
I stitched the holes closed with some green yarn
as well as the head opening.


 (Aye, I should 'ave posted this 'ere tale on St. Patrick's Day!)


I stitched up the top and bottoms of the sleeves for some fancy-shmancy leg-warmers...
 that could be worn two different ways.


 For the basket,
I decided first to replace the dwindling handles...


with some fun green yarn...

all corchetted together.


I stitched the new handle right through the basket...


 and then tied it off.


 The sleeveless, holeless sweater was set into the basket...

and a hole cut for the new handles.

I promptly stitched around the edge of the hole with yarn
to keep the sweater from unraveling.

I then crocheted a stitched border around the outside of the lining,
also making some button hole loops in it.

I found a variety of large buttons which were then sewed
at equally spaced locations
around the edge of the basket.

This way, the lining can be removed and washed
if one of my kids decides to hide a questionable treasure in my basket.


(This could have been much simpler if I had just skipped making the handles
and just inserted the sweater-liner into the basket,
but we were watching a movie series last winter when I did this project,
and I sometimes get carried away when engrossed in a movie.)


Two uses for an old sweater.

Do I win some kind of award for being extra green on this project?
Maybe I'll go make some leg warmers out of that hot pink and yellow striped sweater I have...
for my sisters' Christmas presents.
Oooooo.....

Tip Junkie

Wednesday, January 18, 2012

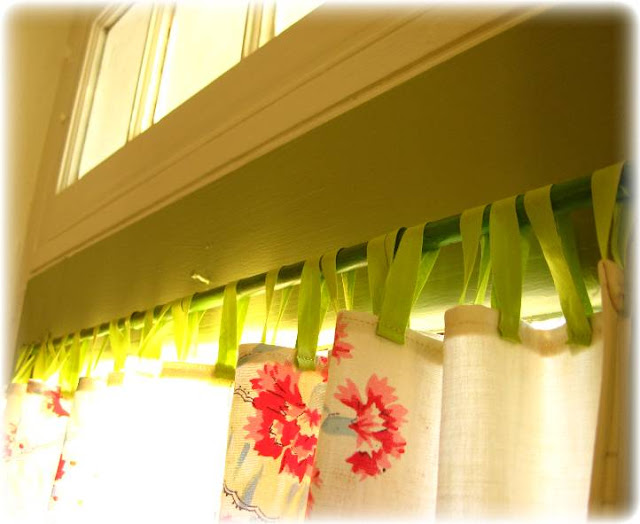
Vintage Curtains From a Well-used Table Cloth.


My Mom was a picnic person.
Summer days were often spent 
somewhere near a picnic table,
whether it be away for the day,
or at home in our 4 foot deep swimming pool
where lazy summer days were spent making whirl pools
and playing Marco Polo
till our pruney fingers were blue with cold.

Wherever we were,
Mom always had picnic suppers ready.

And picnic tables to a super clean mom like mine
always needed table cloths.


As I have set for myself the goal of finishing the kitchen this month,
after almost 8 years of living here,
to finally have it painted and fixed up,
for the most part,
the next thing on my list last week was
curtains.

I loved the ideas I saw on Pinterest of using vintage towels,
hankies, and
linens


I spent some time looking around for vintage material,
and then I remembered...


the tablecloth:


My Mom gave me this tablecloth.
It is stained and patched where the umbrella went
on her picnic table.

It has seen many happy summer days.

I brought it out from the cupboard,
and measured
and remeasured
then cut it up so that I could get two curtains for the door window
and a valance for each of the two kitchen windows.


Digging through my container full of zippers,
rick-rack,
and bias tape I bought up in huge quantity at a yard sale long ago,...


I found the perfect lime green bias tape for my curtains.

A fearsome amount of measuring and ironing
ensued for an anti-ironing woman.


I stitched the underside with the bias tape tucked under the hem first,
then folded the fronts down,
and sewed across the top on the right side.


The curtain rod was rusty gold metal
and very unbecoming,
albeit quite vintage.

So I opted out of that look
by painting a coat of Annie Sloane Antibes Green paint
and then waxing with Fiddes and Son Rugger brown wax.


Despite the obvious stains on the curtains,
I'm loving it.


The kitchen door now offers a bit of privacy at night...

while letting in the sun when I come down in the morning.


The blooming Christmas cactus seems to mirror it's new pink-flowered companion.


Now, if I can just keep the little hands from adding any more stains to my pretty curtains...


I guess a few more small ones would be worth it
if they see the same kind of love that they did in their tablecloth life.


Do you carry any fond table-cloth memories?


Thursday, August 25, 2011

My Grandma's Monster.


Deep in the dark, damp basement
has lived the monster I inherited from my Grandmother.

We don't always get along;
it's seen many more years than I
and doesn't tolerate my lack of patience with it.


It is my Grandmother's sewing machine,
and despite it's age and use,
it just keeps right on sewing.

While in the process of sewing,
I call it none better than a hateful monster:
it breaks so many needles,
bunches and chews up material,
and breaks up my threads.

I get so exasperated and think a new machine will work better,
but this thing keeps on working;
and with a few tweaks every now and then
we manage to get the jobs done.


I decided it was high time to rescue it from it's moldy environment
and put it in a place where it's life would be better preserved...
 
and I might actually use it more.


 I resorted to Annie Sloan's chalk paint again.
This is graphite, a deep gray, almost black.


As I was painting,
I noticed a decorative strip was missing on the front door.
I'd never noticed it when it was wood,
but it was quite obvious with the paint.
So I turned to a solution I'd seen on a blog.
First I marked the areas with tape
so that I could keep the width of the strip the same,
and so I'd create a straight line.


I put on some gloves because this is some toxic smelling/feeling stuff.

This multi-purpose repair putty
has a picture of repairing a soap dish in a shower,
so it's a pretty strong adhesive substance.

As long as the dark blue and white remain separated,
it seems to stay moist like clay.

When a piece is pulled off and smooshed together,
a chemical reaction occurs,
and it will begin to set up in about 5 to 10 minutes,
so I've found it is best to use small portions and work in segments.

Otherwise when it starts to dry,
the piece becomes hard, crumbly, and totally unmanageable.

I rolled a thin piece out and stuck it to the cabinet.

Then after that had set-up about 10 minutes later,
I added a second piece to fill in any gaps and to try to give it a more even appearance.
This is definitely something that needs a bit of practice,
but I'm satisfied with how it came out for myself on the first two pieces I've used it on.

(I'll show a decorative piece on a chair I just fixed in the future).

After the graphite chalk paint,
I decided to experiment,
and I used regular latex paint on top for the colors.

I used a white called "Linen" and the green was a collaboration
of two colors,
as I'd done on the floor.
When thoroughly dry,
I waxed the whole thing with Fiddes and Son "Clear" and "Rugger" waxes.


 Some pretty glass knobs I had ordered through Van Dyke's Restoration were added.
(They were a great sale when I ordered my kitchen hardware).


 The added putty strip is a little rough,
but I think it looks better with it
than it did without.


 I have to tell you, the latex (I used satin and semi-gloss paints)
seemed like a plastic coating over the chalk paint.
It seemed to peel a little easier than I had hoped in places,
but the wax helped seal it
and the chipped places ad to the old look,
so I'm fine with it.

I think if a flat paint was used over the chalk paint,
this would not be a problem.

I am pleased with her pretty transformation
as well as her bright new location.


 I think if Grandma were alive,
she'd be happy to see I'm taking much better care of her machine.


I am so very happy to be BACK!!  My computer had a bad mother brain
(sounds rather Frankenstein, doesn't it)
and had to be rebuilt,
so I had a week's break to can vegetables,
vacuum fleas,
work on projects,
and spend some time with the kids,
and my sister who came down for a visit.

But I did miss you all and look forward to catching up!

Thank you so much for all your sweet comments on my previous post!)


Linking up here:
Home Stories At o Z 
Furniture Feature Fridays


The Shabby Nest


Funky Junk's Saturday Nite Special